Moving to a Static Website, part 2: Hosting
Posted onThis is the second part of a four-part blog post covering my move from WordPress to Hugo, a static website generator. This blog post deals with hosting on Amazon AWS cloud infrastructure.
If you haven’t read the first part, you may find it at Moving to a Static Website, part 1: From WordPress to Hugo.
Initially I thought I would take advantage of GitHub Pages to host my site, as I know many others do.
My initial requirements were:
- Support custom root domains (i.e.
example.com). - Fronted by a CDN – should be available and reliable for everyone around the world with very low latency.
- Support HTTPS – HTTPS is very important nowadays:
- Improve your SEO – Google recently announced that they would start ranking sites with HTTPS support higher than sites that only work under HTTP.
- Better Analytics – Browsers won’t send the important “Referer” header when a user follows a link from a HTTPS site to a plain HTTP site. As more and more sites start forcing HTTPS, this becomes a larger and larger problem for site owners without HTTPS enabled.
- Protect your content – HTTPS means all the traffic between your site and your users is sent over an encrypted connection, and no-one can tamper with the source code of your site.
- Take advantage of new technologies – New specifications like Service Workers explicitly limit support to HTTPS origins, and there are talks about moving in that direction for some existing browser features like geolocation.
Unfortunately, GitHub Pages does not support HTTPS for custom domains nor does it give the ability to force HTTPS-only interaction. Solutions using a CDN like HTTPS support with CloudFlare only help solving half of the problem. The connection between the user and CloudFlare is encrypted, but the connection between CloudFlare and GitHub Pages will need to remain in plaintext. For more information on why this is the case, read Add HTTPS support to Github Pages.
After doing some research, I realized I could host my static site on Amazon S3 fronted by Amazon CloudFront CDN for almost nothing the next year using the free tier. After that, the cost looks to be less than a dollar a month.
Although the Amazon S3 / CloudFront combination suffers from the same drawback as GitHub Pages / CloudFlare (Amazon S3 does not support HTTPS!), I find it preferable because it allows control over file-level response headers, so you can set things like Cache-Control for optimal performance.
Amazon S3 Buckets
The first thing we need to do is to create two buckets to support requests from both the root domain such as example.com and subdomain such as www.example.com. One bucket will contain the content and the other will redirect requests to the first.
This is not needed when using CloudFront, as all requests will be directed to your CloudFront distribution. However, you would end up having your site available on two different domains (example.com and www.example.com), splitting the precious SEO juice between them and screwing-up bookmarking. Furthermore, as S3 buckets namespaces are shared by all users, you should better name it according to your website, just in case you may decide to drop CloudFront one day.
Create the buckets
Open Amazon S3 console at https://console.aws.amazon.com/s3 and execute the following steps:
Choose Create Bucket.
On the Create Bucket page, type the bucket name and select the region, then choose Create.
Upload data
To upload your content using the console UI, execute the following steps:
Select the root domain bucket (
example.com) and choose Actions, then Upload.Select the files to upload and press Start Upload.
Set the bucket policy
Next, we need to add a bucket policy to the example.com bucket to make the uploaded files publicly accessible:
Click on Permissions, then Add bucket policy.
Copy-paste the following lines (don’t forget to change the bucket name to your bucket name in the
Resourcekey):{ "Version": "2012-10-17", "Statement": [{ "Sid": "AddPerm", "Effect": "Allow", "Principal": "*", "Action": [ "s3:GetObject" ], "Resource": [ "arn:aws:s3:::example.com/*" ] }] }
Enable static website hosting
Now we need to configure the example.com bucket for website hosting:
Click on Static Website Hosting, then select Enable website hosting.
Enter
index.htmlfor the Index Document field, then click Save.
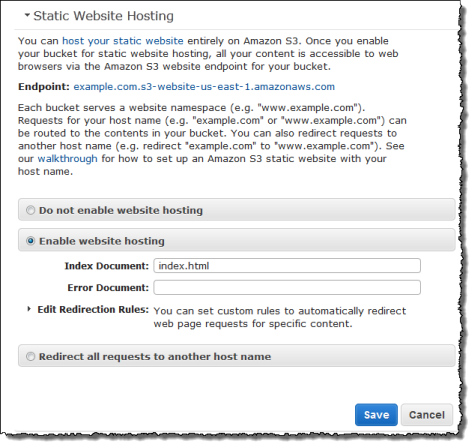
Note: Copy the URL for the website endpoint. We will need it when creating the CloudFront distribution.
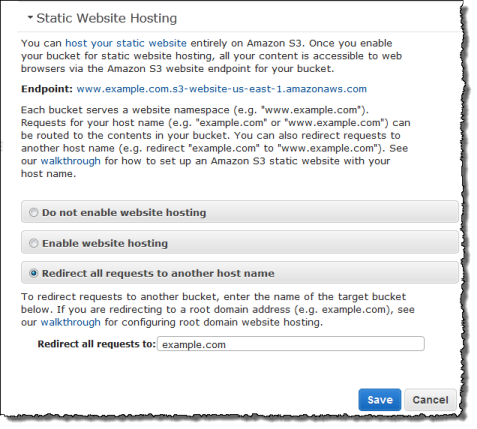
Redirect URLs from www to non-www
Finally, we need to configure the www.example.com bucket to redirect all requests to example.com:
Click on Static Website Hosting, then select Redirect all requests to another host name.
Enter your root domain address for the Redirect all requests to field, then click Save.
We now should have a fast static website for people near our Amazon S3 region, but for others, it will be a lot slower.
It’s time to introduce CloudFront to the game. But before that, we need a SSL/TLS certificate to support HTTPS.
Amazon Certificate Manager SSL/TLS certificates
Open ACM console at https://console.aws.amazon.com/acm and execute the following steps:
Choose Request a certificate.
On the Request a certificate page, type your domain name(s) (wildcards like
*.example.comare supported!) and choose Review and request.In the review page, verify that the information you entered is correct and choose Confirm and request.
Amazon CloudFront distributions
Time to make our website fast to everyone in the world thanks to Amazon’s CDN.
Open CloudFront console at https://console.aws.amazon.com/cloudfront and execute the following steps (repeat the process for each S3 bucket you created before):
Choose Create Distribution.
On the first step of the Create Distribution wizard, in the Web section, choose Get Started.
Specify settings for the distribution and choose Create Distribution.
WARN: Since your Amazon S3 bucket is configured as a website endpoint, make sure that:
In the Origin Domain Name field, you enter the Amazon S3 static website hosting endpoint for your bucket; do not select the bucket name from the list.
In the Origin Protocol Policy field, you must specify HTTP Only. Amazon S3 doesn’t support HTTPS connections in that configuration.
Your CloudFront distribution will be ready to process requests when the value of the Status column changes from InProgress to Deployed.
My distribution for the root domain looks like this (Click to enlarge):
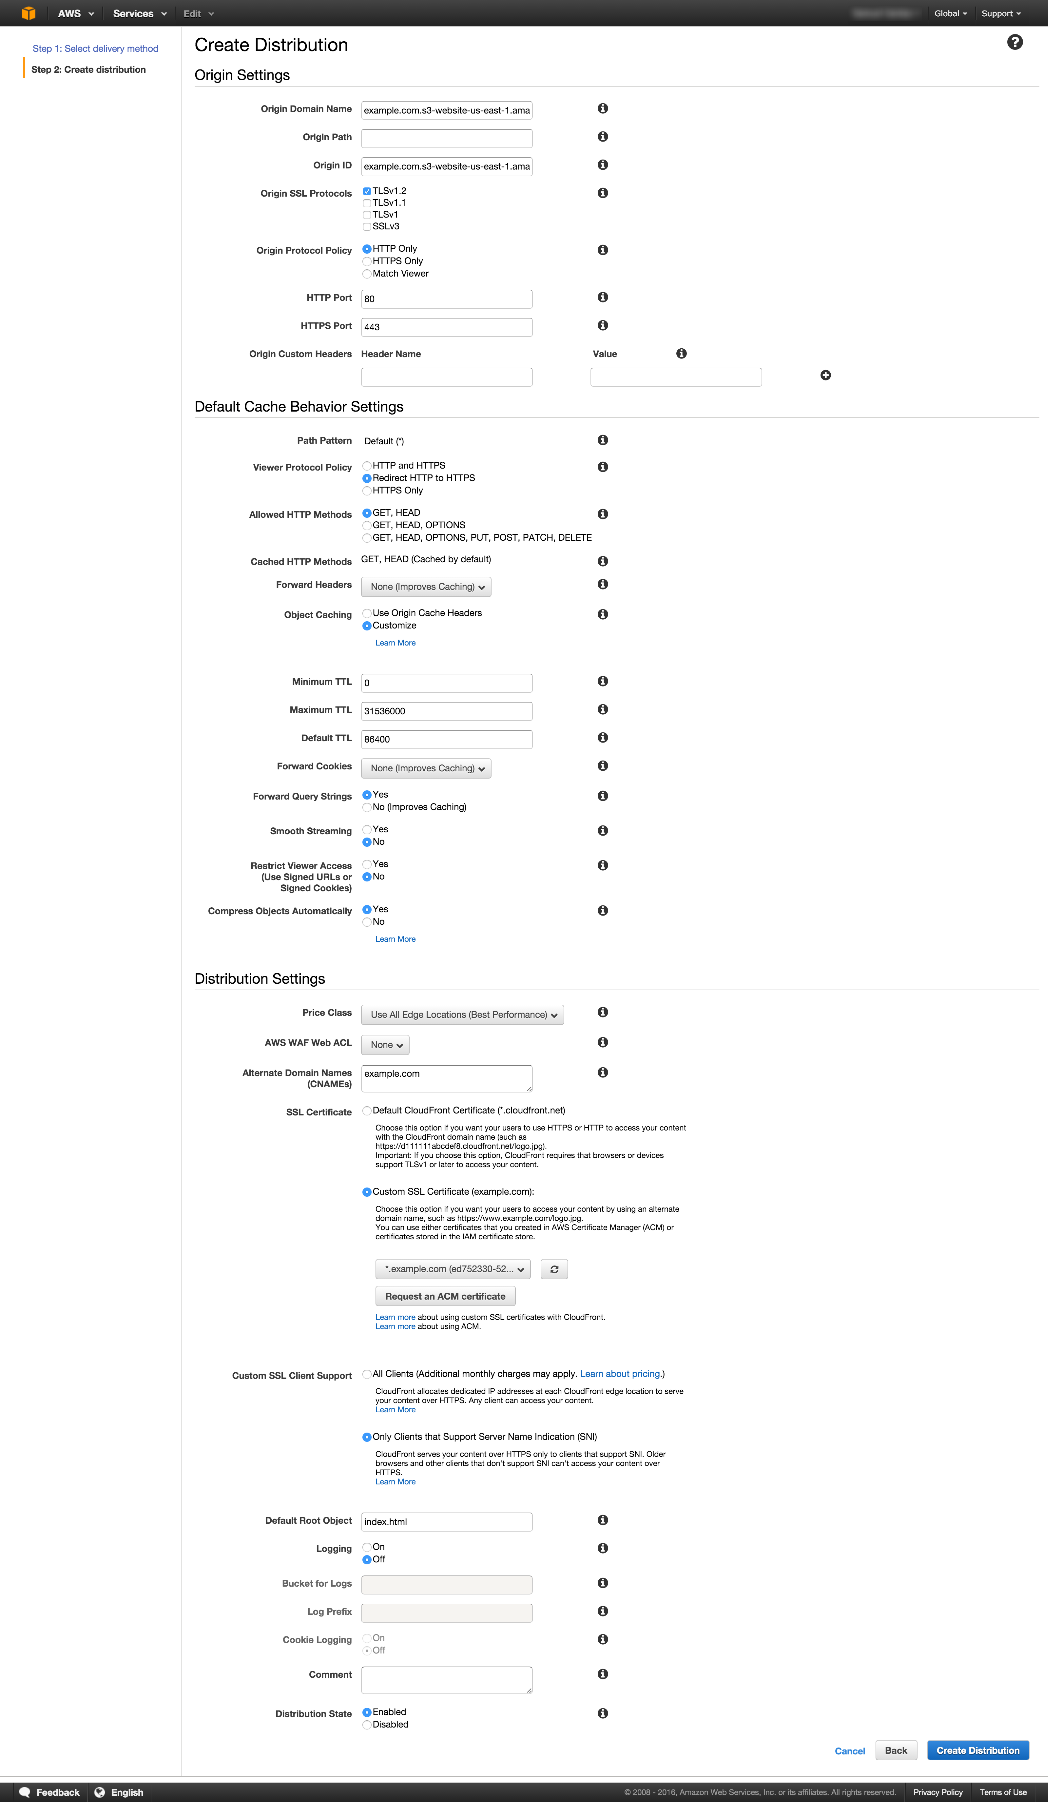
CloudFront distribution example
To test your website, copy your CloudFront domain name (something like d111111abcdef8.cloudfront.net) and open it on your browser.
Amazon Route 53 hosted zone
Finally, lets make our site URL prettier by pointing our custom root domain to the CloudFront distributions we just created.
This step is optional, Amazon Route 53 is required if you want to be able to access your website at a naked domain without the www prefix (i.e. example.com instead of www.example.com). This is because, according to official DNS specs, it is not possible to create CNAME records on naked domains. Some registrars will let you to do it, but since it’s non-standard it may not work entirely as expected. Route 53 gets around this because you can create an A record that’s just an alias to the specific CloudFront distribution and avoid the CNAME issue altogether. If you don’t need to access your site at a naked domain, then you can get away without using Route 53 (just create the necessary CNAME records in your registrar’s DNS servers).
Open Route 53 console at https://console.aws.amazon.com/route53 and execute the following steps:
Select Hosted zones and choose Create Hosted Zone.
Enter your Domain Name and select Create.
On the hosted zone details page we need to create two alias, one for each CloudFront distribution:
Select Create Record Set, leave the Name empty, choose “Yes” for Alias and on the Alias Target select your CloudFront distribution.
Select Create Record Set, enter
wwwfor the Name, choose “Yes” for Alias and on the Alias Target select your CloudFront distribution.Go to your registrar and replace your name servers with those of Route 53.
My hosted zone looks like this (Click to enlarge):
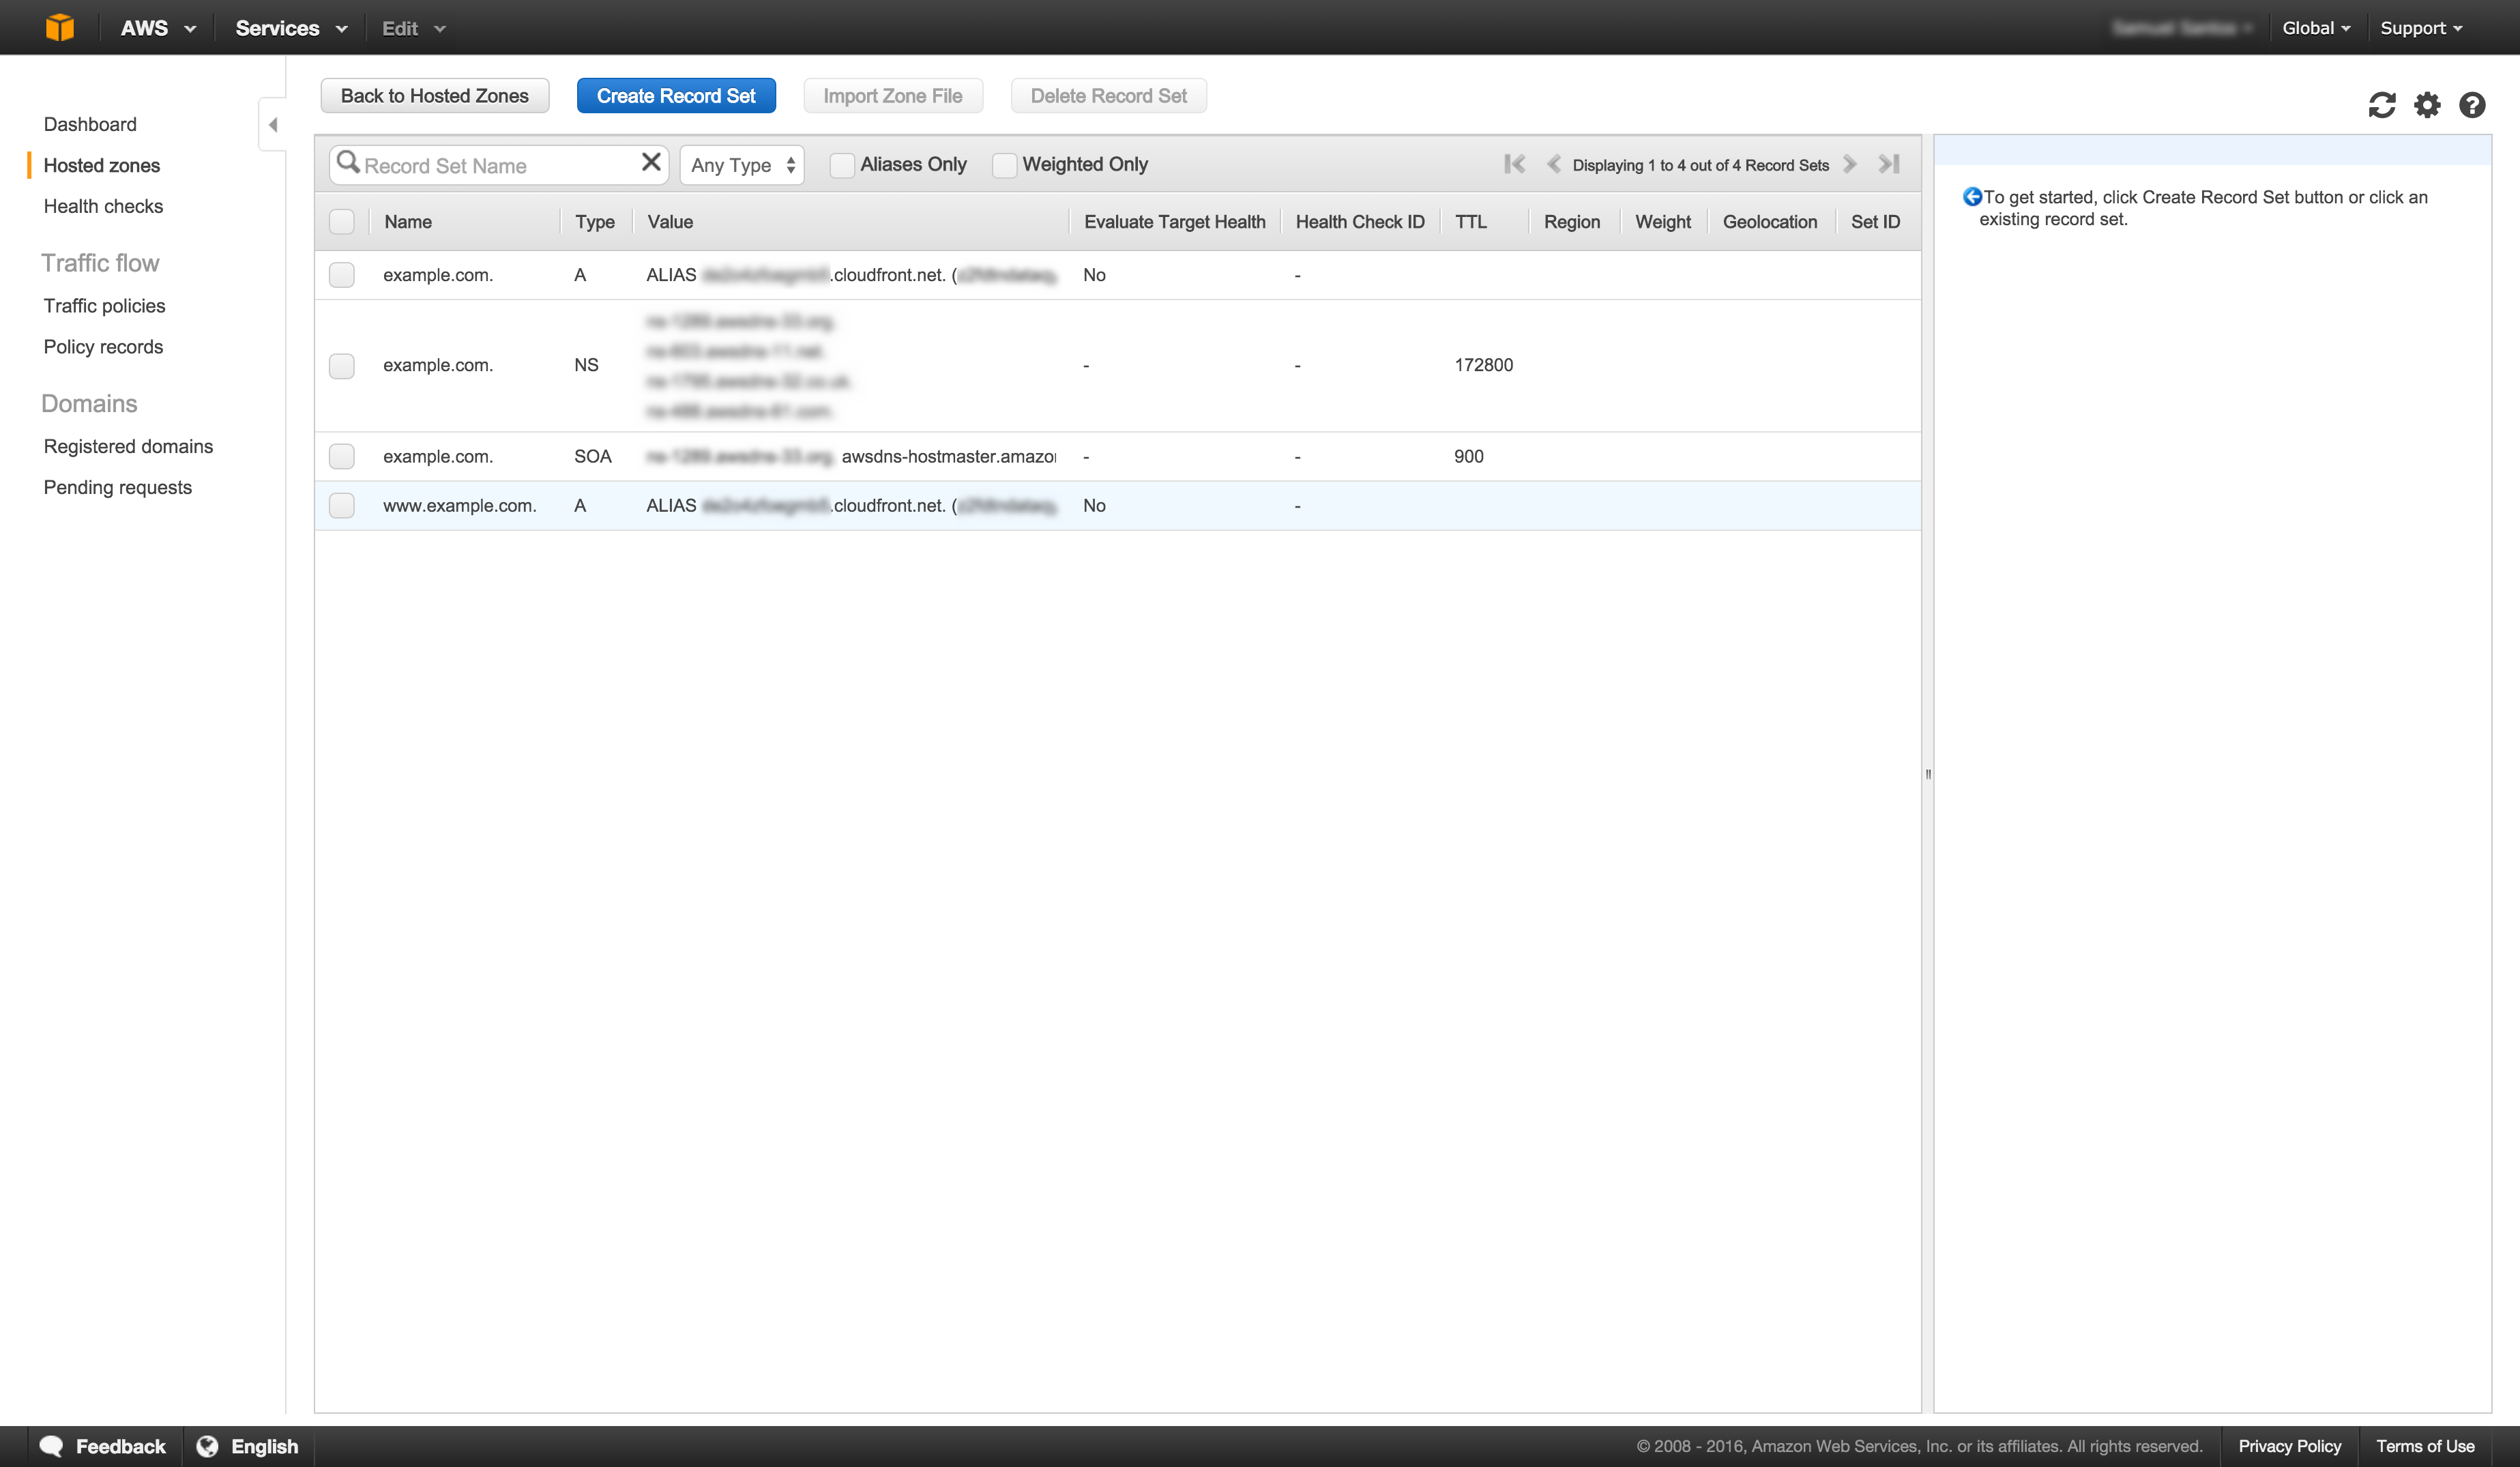
Route 53 hosted zone example
Now relax and wait for the propagation of your DNS changes. Name server changes usually take 24 to 48 hours to fully start working.
Comments
comments powered by Disqus